Finding Joy in the Process
On March 25th, 2017, I celebrated the close of my 2016 Minnesota State Arts Board Artist Initiative grant with an artist talk and exhibition at FOCI – MN Center for Glass Arts, Minneapolis.
My grant outcome includes an educational component – to share a crystal casting process I’ve been developing for more than thirty years, to increase awareness of this beautiful and versatile art form.

For those near and far who were unable to attend the event, I’ve transcribed my presentation and accompanying slides to illustrate my techniques. Please feel free to contact me with questions about my process, or to inquire about available work. Thanks so much for your interest!
Paulo Coelho, author of the The Alchemist once said, “The core of beauty is simplicity.”
I feel blessed to see beauty in the smallest of things, and art is my way of sharing what I see with others. I sculpt nature in magnification so you might also notice the small things!
When I was a little girl my older brother, Jim, who is also an artist, offered these magic words to follow when I struggled with my drawings: “Keep it simple – just make it beautiful!”
For the art form I chose to pursue, this is easier said than done. Although crystal is one of the most beautiful materials, casting with it is anything but simple!
These sculptures are larger, thinner and more complex than anything I’d ever cast. And I realized early on that, in order to stay on task and not get overwhelmed by the scope of my projects, I needed to trust my instincts and utilize what I already knew…
I had to remember the joy I originally found in the casting process, and set aside the outcome.
Each of these sculptures took about three months to complete from wax model to finished piece. I’m very pleased with the results, and I’m anxious to explore new ideas that have evolved from my work this year.
In the following nine slides, I’ve compiled photos that compare the different ways I approached each piece. All were cast using the same basic methods, modified to accommodate the model construction and the size and shape of my kilns.
WAX MODELS


Of all the steps in casting with crystal, I’m happiest when working with wax. This is where I find my Zen. Wax modeling is quiet, therapeutic work, where ideas I carry around in my head for years finally come to life!
As I work, I see the forms not as dark, brown wax, but as crystal—full of light, color and texture. In various ways, I heat and shape the wax into graceful forms that I love and admire.
To me form is gesture, and it’s the best way I know to express myself. I’ve always been a student of nature, which serves me well when I construct a new model. However, the simplest natural forms tend to be the most difficult to build.
Without structural integrity, a cast is likely to fail. Casting is a calculated science of gravity, flow and materials, but magic happens inside the confines of a plaster mold!
The crystal sculpture emerges exactly as the wax is encased, right down to a single fingerprint. Perfecting the wax is far easier than cold working the crystal later, so I gladly spend weeks on my models to limit the more difficult finishing work.
A wax model is constructed on top of a reservoir box large enough to hold the amount of crystal necessary to complete the sculpture. The model is attached to the reservoir via a short wax funnel called a sprue. The entire structure is secured to a board or tile, which supports the piece throughout the molding process.
People often ask how I achieve the subtle textures in my work. The secret is a light touch with a warm silver spoon! When I’m certain the model is finished, I take one last check and it’s on to the heavy work.
BOXING AND PLASTERING


This stage is a bit more complicated, as every wax model is considered individually for plastering.
My casting method is called lost wax, because the positive form is melted out of the plaster, resulting in a negative void. Complex waxes can be used only once, because there’s simply no way to reproduce them.
Rubber impressions can be pulled from simple forms for casting in multiples. In every instance, though, when a wax model is enclosed in plaster, it will be lost in the process.
The top photos in this slide are the thin, vertical models for Wing and a Prayer, the Hibiscus flower and Lagoon. Three kinds of plaster were either sprayed or hand-built onto the wax models, in a dozen separate layers. These layers insulate and breathe with the crystal as it heats and cools.
The shape of the model determines the type of mold I make and the kinds of plaster I use. The top three molds in this slide fit into my vertical kiln, but the palm and ginkgo leaves below would not; these had to be cast horizontally in my bathtub-shaped kiln.
I built a sturdy screen box around each of the horizontal models, (shown here in the bottom photos) and waterproofed the enclosures with fiberglass soaked in refractory cement.
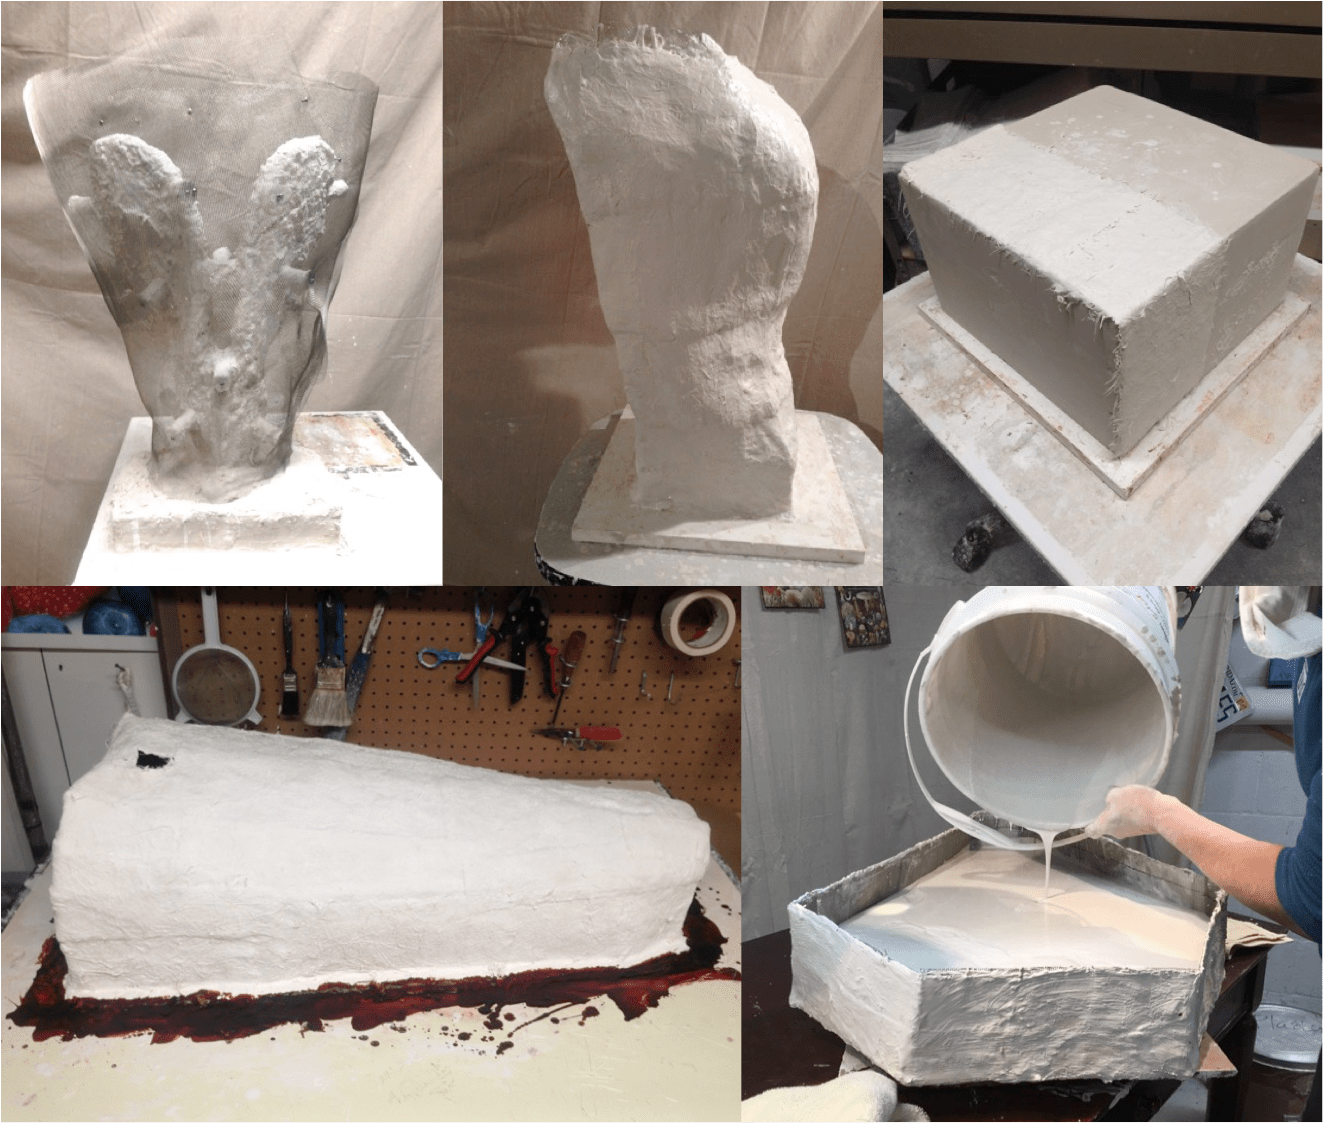
The mesh and plaster boxes for the palm leaves and ginkgos in the bottom photos were filled with 70 lbs. of just one kind of plaster, which had to be filled in a single pour!
The layered plaster forms in the photos above were also surrounded in stainless steel boxes. The short stubs you see inside the cage of the top left photo are there to maintain even spacing as the plaster dries and contracts.
These boxes were also covered in fiberglass and cement and filled with a weak investment mix for additional strength and insulation. It took 350 lbs. of plaster to create the six molds necessary to complete my four sculptures.
PREPARING THE MOLD FOR FIRING


Once the plaster mold has cured overnight, the wax model is removed using a wallpaper steamer and a drip container set underneath the mold. This leaves an empty void that will fill with molten crystal inside the kiln.
When all of the wax is melted out, the plaster mold is inverted in the kiln to dry. Drying takes 24 hours per inch of plaster thickness at a low temp of just 325 degrees. The thinner the mold, the less time it takes to dry. Most of these molds dried in the kiln for five days, and as you’ll see in a later slide, they should have dried longer.
The 45% lead crystal billets I use to cast my sculptures are made in New Zealand. I complete volume calculations based on the weight of the wax, and place the billets in the open reservoir.
I program the kiln according to the thickest part of the model, and turn it ON. And the waiting and worry begins…
On average, each of the six molds spent ten days in the kiln, most of that time just drying and cooling. 12 to 24 hours is usually all it takes to fill even the deepest mold with crystal, which becomes fluid like honey at 1500 degrees.
Once the cavity is full and I can see no large, visible bubbles on the top surface, the kiln begins its annealing and cooling stages.
A two-inch thick sculpture like Wing and a Prayer drops just 5 degrees an hour, picking up speed once the strain is removed from the glass at around 600 degrees. I grew so used to the constant warmth and clicking sound of the kilns this year that it makes me sad when I walk by now and see the idle lights flashing. I’m anxious to get them firing again!
FIRING COMPLETE


This is how the molds look when I open the kiln. I always try to have extra crystal in the reservoir for insurance, so there is often a bit that I have to grind off.
The plaster techniques and products I use perform beautifully, with only minor cracking due to my own impatience. The trick is having more work underway to distract me from the molds in the kiln!
When the mold reaches room temperature, it’s safe to remove the crystal from the plaster. Since the molds are pretty weak at this point, I remove much of the mold inside the kiln. It’s messy, but safer than trying to get it out in one piece.
BREAKING THE MOLD


Divesting the mold is like an archeological dig, and it’s the second best part of the process!
The mesh screen cuts through easily and the plaster usually falls away in large chunks. But after all the years I’ve been casting, I’m still never entirely sure what I might find inside the mold.
It was highly important to me that all four of these pieces made it through to completion. Luckily, I was able to work with every crystal part that emerged. There was a good bit of flashing from cracks in the plaster molds, but nothing I couldn’t deal with.
The challenge of casting lies in the countless variables that can and do occur during the lengthy process; the skill lies in controlling those variables to ensure a successful outcome.
FINISHING


At first it’s exciting to see the new piece as it emerges from the plaster, but then the reality of finishing sets in.
Once the crystal is clean of plaster, the cold working begins.
Using a hand engraver and diamond bits, I grind off sprues and crystal left in the reservoir and any fins caused by cracks in the plaster.
I grind and sand surface details to a matte finish, and sandblast the entire piece for a consistent texture. I coat all finished pieces with warm beeswax, which brings out the soft, natural luster of the crystal and makes them touchable.
Lastly, I sign each sculpture. There’s no better feeling than etching my name into a sculpture after months of hard work. This is the very last time I touch the piece with a tool.
The most valuable revelation I had this year is that my artwork has finally become my signature. All my life I’ve compared my art to others, trying to figure out where I fit in. I’ve come to realize that my art and my process are now unique to me, that my work can’t be compared to others, only measured against them. My art is evidence of the person I am and the way I see the world around me.
BASES


The bases for my sculptures are made in collaboration with Wayzata, MN metal sculptor, Judd Nelson. Judd worked from my designs to custom-fit the crystal forms neatly into their forged steel and copper stands.
In college, I worked separately with metal and glass, but had never successfully combined the two.
It’s been fun working through the process with Judd, but he’s a man of few words who works very fast! Judd will tell you that I get just a little anxious when we do the final fittings, but it’s all good in the end!
STUDIO


I thought you might like to see where grant money not spent on mountains of plaster and crystal was put to great use to improve my studio.
Recent awards from both State and Regional Art Boards have helped to brighten my workspace with new LED lights, provided carts and workbenches and, most importantly, a vented grinding booth to protect my lungs from glass dust.
I’ve established separate work areas for each stage of my process. Pictured here are my wax and finishing “Zen” area, kilns, often messy grinding and mold-making space, and sandblasting setup.
My studio is always open to visitors, and I love to share new work in progress.

Thank you all for your interest in my work and for supporting the ever-elusive edge of art.
Mid-century artist Ann Truitt once wrote:
“It is not true that only artists understand art, for there are in every generation some people who not only understand it but also enhance its reach by appreciation.”

Hi Donna, thanks for sharing your process on your beautiful work.
This morning, I happened onto your gorgeous work displayed on the R & R website.
It is inspirational to read about and see pics of your process and the finished pieces. WOW!
Thank you for sharing and for all the quotes you’ve included.
I’m excited to go into my studio this morning and see where this inspiration will take me!
Best,
Marjie Anderson
Dear Marjorie,
I am deeply sorry that I did not see your lovely comment until I posted a new entry today. I’m glad to learn that my work is getting notice at R & R website and especially that it inspired you, if only for just that day! Thank you SO much for leaving this wonderful message for me to find, even this late 🙂 Best regards, Donna
Nice article. I’m trying to source lead glass billets for a cold working project. Your article mentions these can be sourced in New Zealand but I’ve not been able to find any reference to them. Can you provide a contact for these billets? Any help greatly appreciated.
Finding Joy in the Process” is a refreshing perspective that reminds us to embrace every step of our journey. A valuable reminder to savor the small victories along the way.
Finding Joy in the Process” beautifully captures the essence of cherishing every step of our journey. A heartfelt reminder to savor life’s moments and embrace the growth they bring.
xl2wat
c3r42i